I wanted to test the High Availability features of Palo Alto Virtual Appliance (version - PAN OS 8.0) firewall, so I have deployed two appliances named PA-HA-01 and PA-HA-02 in a single host running ESXi 6.7 managed by a vCenter Appliance 6.7. This is just a simple Active-Passive HA setup with successful tests of configuration synchronization.
It is better to run those two appliances in different hosts for better availability but I have to manage with a single host, so I have made some changes in the vSwitch which I will discuss below.
Palo Alto HA feature requires two separate control and data networks to be setup. There is also the management network for the appliances. So I have setup a vSwitch named vSwitch2 in the host without any uplink physical ports from the server. And then I created a Port Group named PA-HA. The above mentioned data and control network will be utilizing this Port Group (PA-HA). It should be noted that we are not using any physical uplink ports in the vSwitch2 configuration, so the data and control networks from both the appliances will communicate each other through the vSwitch2.
In production environments, where two virtual appliances are deployed in two different hosts, the HA data and control networks would communicate with each other through dedicated physical uplink ports.

Server Configuration
vCenter: vc2.prv.com
ESXi host: srv.prv.com
Virtual Appliance Configuration
PA-HA-01
Management IP: 192.168.200.3 (vNIC 1)
Primary Control Link IP: 192.168.5.3 (vNIC 3)
Primary Data Link IP: 192.168.6.3 (vNIC 4)
Device Priority: 77
PA-HA-02
Management Network: 192.168.200.4 (vNIC 1)
Primary Control Link IP: 192.168.5.4 (vNIC 3)
Primary Data Link IP: 192.168.6.4 (vNIC 4)
Device Priority: 100
We can also setup secondary control and data links but I have omitted them as this is optional.

We can see in the above image the details of the PA-HA-01 Appliance.

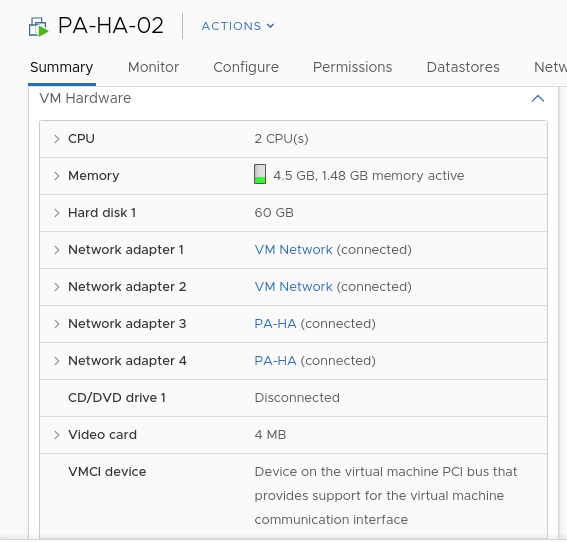
Then the details of the PA-HA-02 Appliance.
The images below show the details of the Virtual Machine's hardware. Network adapter 1 is used by the Palo Alto management interface which we will access through the browser. Network adapters 3 and 4 are Control and Data Links respectively for both the appliances.

Interface Configuration
So now we access the web interface of the PA-HA-01 through the IP 192.168.200.3. When we select the Network tab and the Interfaces section we can see the three interfaces. We have seen above that there are four network adapters for both the appliances, but we can see below that there are only three interfaces. This is because the first interface is used by the Appliance management and provides the web interface shown below through the IP (192.168.200.3).
I have already setup the interfaces ethernet1/2 and ethernet 1/3 as Interface Type "HA".

We can see similar setup in the PA-HA-02 Appliance below when browsing through the management IP 192.168.200.4.

We change the Interface Type by clicking the interface name and select HA in the Interface Type as shown below. There are other options such as Tap, Virtual Wire, Layer2 and Layer3 as well.

High Availability Configuration

The HA configuration dashboard shows us various configuration options in the above image. Under General tab, the first Setup option gives us the options of enabling HA, config sync and the peer HA1 IP address. Since this is the first appliance (192.168.200.3), the peer HA1 IP address is the second appliance Control Link IP (192.168.5.4).
The Data Link option has similar configuration options - Port (ethernet1/3) and IP address (192.168.6.3).
Then in the Election settings, we can change the device priority. For PA-HA-01, I have set the priority to 77 and for PA-HA-02 the priority is set to 100. The lower priority appliance will be active in the HA while the higher priority appliance will be passive. As per our configuration, PA-HA-01 will be active with priority 77 and PA-HA-02 will be passive with priority 100.
There are other options as well but we will not make further changes in the HA configuration.

In the second appliance (PA-HA-02) with management IP 192.168.200.4, under General tab, in the first Setup option the first appliance's Control Link IP (192.168.5.3) will be the peer HA1 IP address.
The Data Link option has similar configuration options - Port (ethernet1/3) and IP address (192.168.6.4).
The device priority as stated above is 100 making this appliance passive.
The HA configuration as stated above for both the appliances can be viewed in the below images.


Verify Configuration
After completing the HA configuration, we can add the High Availability widget from the Widgets drop down box from the Dashboard tab on both the appliances to monitor the HA status.
In the below image, we can see that the local appliance (192.168.200.3 / PA-HA-01) is the Active Node and the peer (192.168.200.4 / PA-HA-02) is the Passive Node.

Similarly, as shown in the second appliance (192.168.200.4 / PA-HA-02), we can see that the local appliance is the Passive Node and the peer (192.168.200.3 / PA-HA-01) is the Active Node.

HA Configuration Synchronization Test
For testing the HA configuration, I have simply created three Zones under the Network tab named Support_LAN, DMZ, ISP in the Active Node.

Then I commit the changes made in the Active Node, as shown below.

After the commit is successful, we can see in the HA widget the running configuration synchronization is in process, which means the changes made in the Active Node is being saved in the Passive Node.

Then, we can finally verify the configuration in the Passive Node. The three zones have been created in the Passive Node as well.

Thus, we have successfully completed this simple HA configuration in Palo Alto Virtual Appliances. In future blog posts I hope to post more PA or other security related content.
No comments:
Post a Comment
Note: Only a member of this blog may post a comment.